If you have been following along, you’ll recall that about a year ago we shared some bad news about the game name and our business name. Well, if you couldn’t tell by today’s title, we are now able to rectify that post by revealing the updated name of the game: The Violets of Amicus™!
This project has had its ups and downs, and last year around this time was definitely a valley. But today we stand atop of a mountain, proud of what we’ve accomplished so far, and excited for what’s to come!
February 2025 will mark the launch of our Kickstarter to fund the rest of our project. To get there, we have a good amount of work ahead of us, but nothing that our team can’t tackle. What we need is support and dedicated folks such as yourself to help get the word out to the masses. A good start would be to direct people to this website! Explain to them that The Violets of Amicus™ will be an action / adventure game similar to that of traditional 2D Zelda games.
The anticipated release of our demo is December of 2024, or January of 2025, available on Steam for Windows and Mac. We plan to have a stand alone demo available as well (i.e. not through Steam), with some helpful guides for installation. We also have a rough cut of the trailer complete, but this trailer will have to wait to be seen until the public demo is available. We promise it will be worth the wait!
We Need YOUR Help
This project will only be successful if YOU help share it with others. In the upcoming months, we are going to be hitting the social media platforms and getting pages/channels/etc. added. When these are added, please like/follow/share with those you think will be interested in this project. The more eyes on this, the better chances we have of being successful!
For those who have followed along and have helped contribute, whether with game assets, testing, or simply being supportive, THANK YOU! We couldn’t do this without your support!
These first couple months of the year have been ridiculously busy. As we prepared for this year, we knew we’d have more expenses in preparing for our Kickstarter in February of 2025. Therefore, I (Dan) took on a second side project for a few weeks that would help offset these expenses. Concurrently, we also added a couple of contractors that were assigned with one specific task, as we wanted to get these figured out sooner rather than later. As much as I love working with others on this project, I didn’t realize that managing all of these pieces, on top of my full time job and side project, would consume so much of my time. February ended up becoming one of the busiest months of my life. To top it off, our dog ended up hurting his back, and one of our cars got into an accident that made it undrivable.
Despite all of the hurdles, we managed to get a lot accomplished in the past couple of months. This is mainly due to the awesome team we have, crushing it, while I was getting crushed!
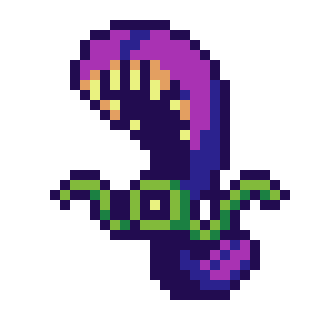
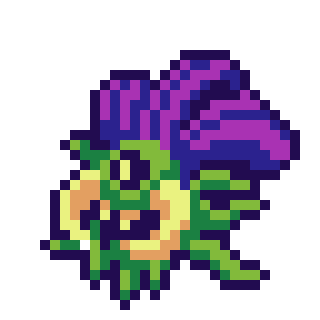
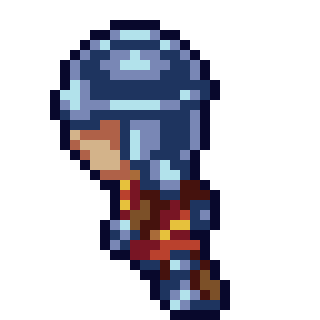
Concept Art
Corinne was tasked with three pieces since we last posted: King Archon, Weapon Shop Guy (working name) and the Advisor (working name). Below are these illustrations:
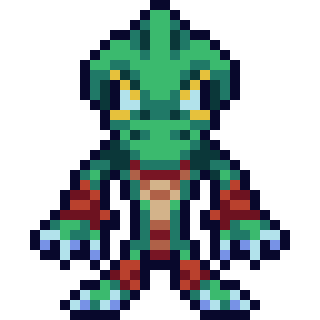
King Archon
On the Eve of Remembrance, King Archon’s son fell severely ill. King Archon issued a decree that if anyone could find a remedy to heal his son, they would be rewarded beyond their wildest dreams.
Indeed, Velare has been rebuilt into a great land. The Withering did not succeed in our destruction. However, my hope is still fragile. The prince, my only son, fell severely ill on the eve of Remembrance. Surely you all have been informed about the Royal edict I made concerning the prince… If anyone can find a remedy to heal my son, they will be rewarded beyond their wildest dreams. Remembrance is a solemn holiday for us Velareans, and interrupting this is uncouth. But how devastating would it be if the future King of Velare were to perish! I beg of you, citizens of Velare… if anyone has a cure, please step forward!
– King Archon, interjecting during the Remembrance Ceremony
Weapon Shop Guy
Weapon Shop Guy (working name) is an enthusiastic smith that is in charge of Castle Town’s Weapon Shop. He is one of nine siblings, who are all brothers. Ironically, all of them are weapon smiths, because it is the family business, but nobody in the family is really into weapons or fighting in general. They are just really good at their craft! Their job is to go around looking for lost or dropped weapons out in the field, and then to bring them back to the shop and make them stronger.
Advisor
The Advisor (working name) is Velare’s royal advisor who is exceedingly well versed in Velare’s ancient history and society. The Kingdom has always had a royal advisor that’s tasked with educating the king on kingdom matters. Because of the Advisor’s eccentric style, most people, including King Archon, assume he is an archaic, senile, conspirator who wastes his time on myths and fairy tales. One of the Advisor’s duties is to oversee Remembrance.
Music
One of the ideas we’ve had for a while is that when enemies come on screen, the music changes into a more intense version of itself. We’ve finally began testing this theory with some great success! Currently, in most places, we have a really out-of-place track that I (Dan) ran through an electric guitar through to test. The proof-of-concept test worked well. We then began replacing a couple of the bad electric guitar tracks with something real, and the proof-of-concept became a great addition to the game. The seamless transition between the main track and the enemy track really helps sell the idea that something bad is onscreen, and that the player needs to do something about it!
Along with the enemy variations, Tyler has also been composing as well — mostly rearranging some older pieces we have had as placeholders. Below are a few samples:
Castle Town Day
Castle Town Night
Castle Town Enemy
House Theme Day
House Theme Night
House Theme Enemy
Pixel Art
Tony has been crushing it as always on the pixel art end. First, we decided to finish up the Minotaur animations:
Minotaur Twohanded Walk DownMinotaur Twohanded Walk Backwards LeftMinotaur Bow Walk DownMinotaur Bow Walk UpMinotaur Idle DownMinotaur Idle LeftMinotaur Shield Bash Right
When we added the Minotaur Shield Bash animation, we realized we forgot to finish the Reptile Shield Bash animations. Below are those:
Reptile Shield Bash DownReptile Shield Bash LeftReptile Shield Bash Up
We were able to get much of King Archon and the Weapon Shop Guy’s basic animations done:
King Archon Walk DownKing Archon Run LeftKing Archon PortraitWeapon Shop Guy Walk DownWeapon Shop Guy Walk DownWeapon Shop Guy Run DownWeapon Shop Guy Stun Left
Features
The good news about preparing for a Kickstarter is there won’t be a whole lot of brand new features, as we are essentially polishing up the existing ones. The bad news about preparing for a Kickstarter is that we are essentially making the game twice. Therefore, much of these features that we are polishing will most likely end up getting repolished in the future. That’s the nature of game development / releasing a demo!
What this means from a blog post standpoint is hopefully we can do a lot more showing instead of telling! Which, projecting myself (Dan) onto the reader, is amazing, as I don’t like to read!
One of the first things we added in January was for NPC characters to essentially block the players path. That way, the player can’t go into areas they aren’t supposed to reach yet:
One of the feedback items we received was in regards to trying to break a boulder or a crust with a weapon that is unable to. Before, we were giving feedback that it was breakable. We fixed this by adding some visual effects, as well as a new sound effect:
A major item we’ve been working on is making the Dojo teach the player all the different skills one can learn throughout their adventure. We have completed all the ones that will be available for the demo. Below is an example of a lesson:
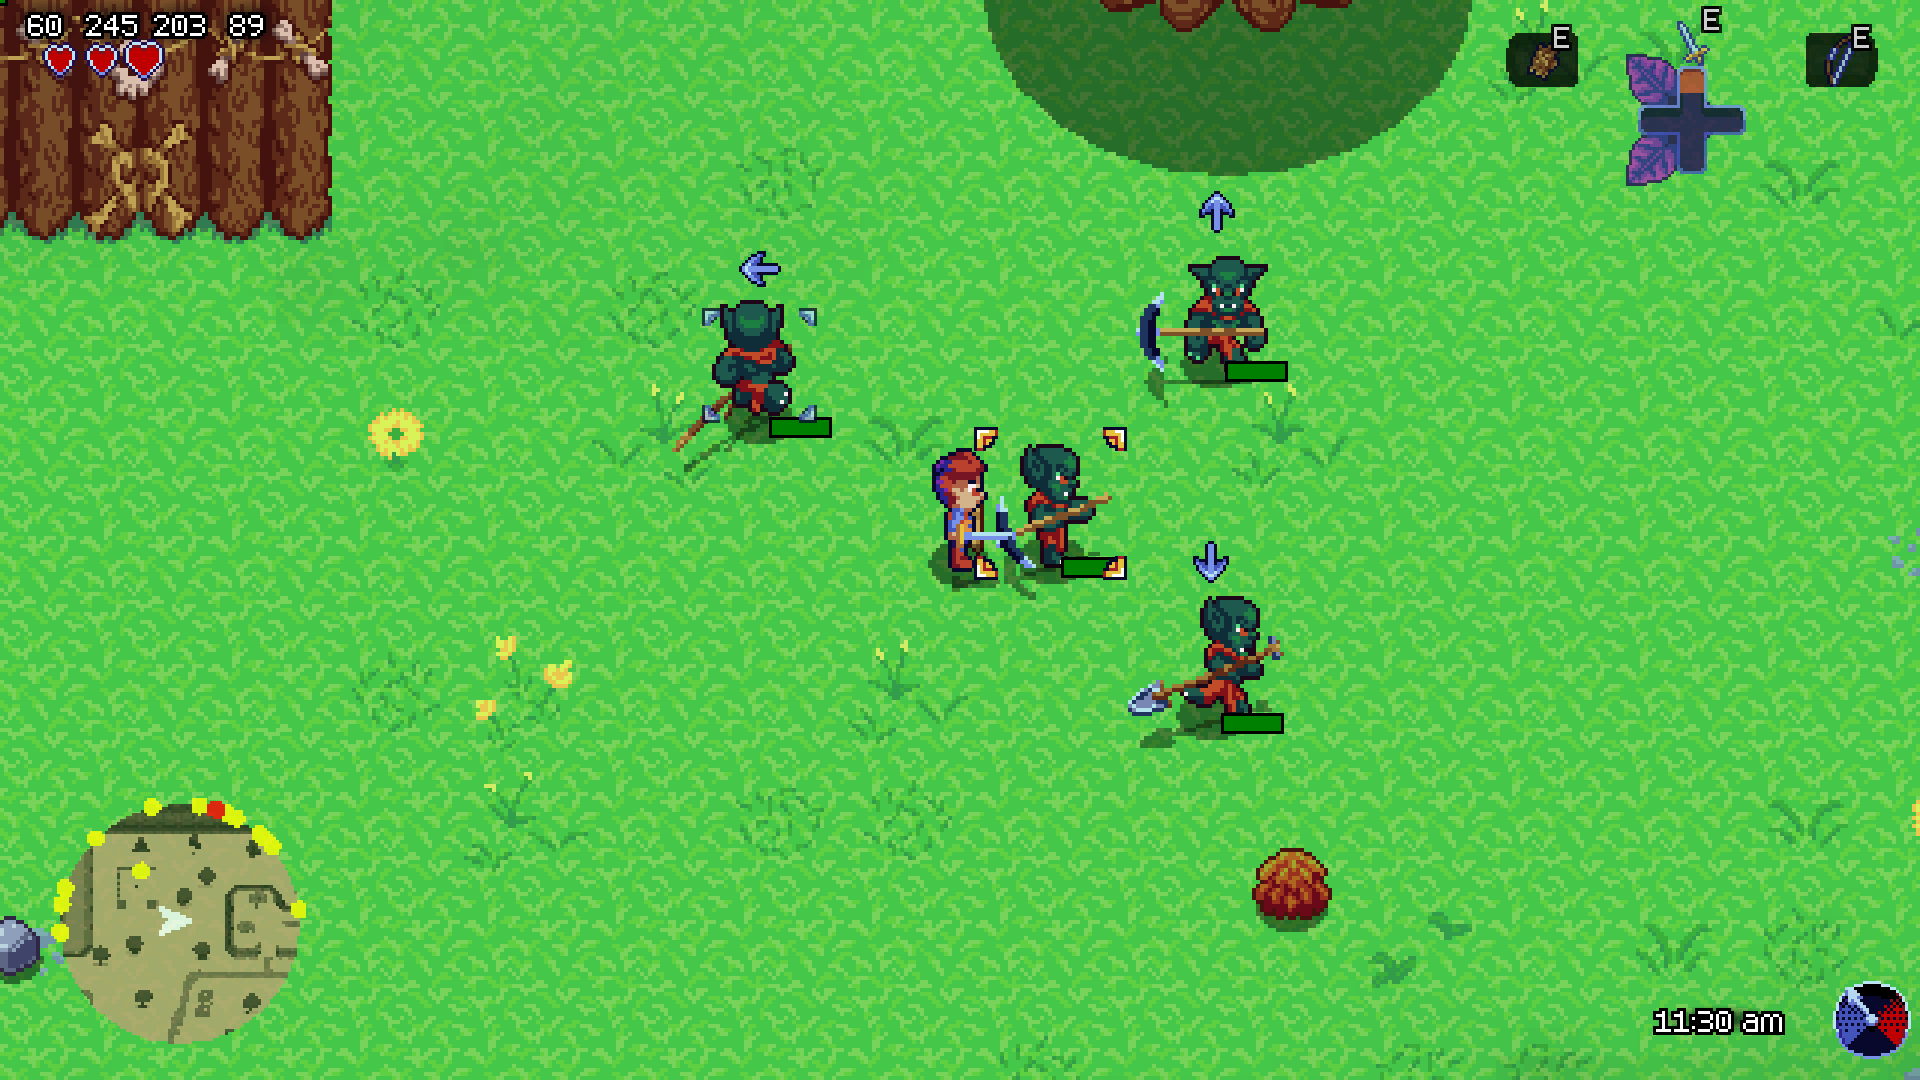
A few months ago, we introduced the titular enemy, the Violet. In the last few weeks, we had the ability for Violets to be in a dormant state. As vicious as the Violets can be, they only attack when they are attacked. We also introduced an easier Violet variation, the green variant:
Tony did a great job adding the dormant / non-dormant animations:
Violet Dormant / Non-dormant Animation
Updated UI
As you probably noticed in the videos above, we’ve overhauled our UI. We hired a contractor, Josh Morrow, a seasoned UI / UX designer who has done many projects of his own. There were a few things in our UI that we knew weren’t a great UX. We had some ideas of our own, but we wanted to take a step back and have an outside perspective take a look with an unbiased / fresh pair of eyes.
Our main goal was to fix a couple of the painful parts of the merging mechanic of the inventory, but what we got was so much more! We’re still in the process of implementing everything. Most of the “so much more” parts will have to be showcased in an upcoming blog post. But for now, here are a few wireframes that we were given, along with Tony’s beautiful pixel art enhancement:
Inventory WireframeMerging WireframeDialog WireframeInventoryMergingDialogItem InfoController How To
Implementing all of this has been the task of mine for the last few weeks. Most of it is implemented based on the wireframes, but there are a few missing pieces. Overall, merging is going to be much more streamlined and easier for the player! We reduced the “number of clicks” from 4 to 2!
The other important piece with our new inventory system was to make sure the player knew that weapons were merged, as well as understanding that their inventory capacity had increased for a given list. Below are some animations that Tony created:
Mac / Resolution / Gamepad Updates
One of our investments was purchasing a new Macbook to test the game on. One of the positives of Game Maker Studio is that theoretically you write your code once, and “it just works” on any other platform. This generally would be true for our game as well. Except, if we recall from our first post in 2023, under the Path Finding Part Two section, we built a C++ library to make path finding work much faster. This was a DLL that only worked within Windows. Therefore, the game would boot up, but our Soldier enemies would not know how to get to its’ target. This is no good.
One of our other contractors these past few months was Hyreon, who helped take our DLL and turn it into a Mac version, called a DyLib. Hyreon was able to figure out all the DevOps around Apple’s nonsense (e.g. Xcode) and get our game working on a Mac! Below is a screenshot if you don’t believe us!
Mac Build
Ironically, the next topic we are going to talk about is the resolution and how we fixed it, and of course this screenshot above is slightly messed up. Windows mode on both PC and a Mac still has its issues. But, we managed to get resolution scaling to work properly in fullscreen resolutions. We even went through the trouble of supporting 16:9 and 16:10 ratios (looking at you, Steam Deck)! We noticed the resolution all messed up originally when we booted the game initially. I (Dan) had admittedly only been testing on 1920×1080 resolutions up to that point, so we definitely wanted to spend some time cleaning that up for our frenemy, Apple and their weird resolutions.
Finally, when testing on a Mac, we realized that controller inputs were not all universally recognized. The simplest way to explain this is the Xbox controllers (and XBox type controllers) use what is called XInput, where Nintendo, Sony, etc. use what is called DirectInput. XInput has support for roughly 18 buttons, while DirectInput can support many, many more (e.g. motion). XInput works natively on all modern Operating Systems, while DirectInput requires additional drivers and other nonsense to make it work natively.
Steam automatically makes our favorite DirectInput type controllers “just work”, which is a big reason why many PC gamers use Steam. Don’t worry, we’re planning on release our game through Steam (more on that in a future post!). But for now, if the player happens to play the game with a DirectInput device, a message will popup stating as much, and what to do to fix it.
Bad Controller Input
Other Notable Updates
Despite what we said at the beginning of the post, we still managed to add a few other functionality updates as well:
We’ve improved the ability for NPCs to find and stand in their starting location, if that is the intention of the NPC.
Obviously one of the big things showcased in this post was the message box that NPCs use to talk. Updating that dialog took a lot of refactoring, especially determining if the dialog is supposed to be for a cutscene (i.e. showing a portrait) or normal (i.e. showing a little tail).
Since we had a few new contractors help, there were some things they found, in which we me made some improvements on. Specifically, the beginning sequence, making it more intuitive on what to do. We also moved some of the story exposition so there was less of a story dump right at the beginning.
We updated to the latest version of GMS (2023-11). And then this week, there was a new version released!
We added a few more cheats, specifically for moving around and capturing game footage.
Kennedy made her first round of text updates. We built a little text editor, forking svelte-jsoneditor as a base.
We hired a QA contractor in charge of hardware, making sure the game works on different platforms, as well as determining the minimum requirements for the game.
Conclusion
There was so much not covered in this post, that pretty much happened in the last week. This may or may not involve the updated name / logo of the game, as well as a rough trailer. Stay tuned!
We wanted to give an update on the game front, since it has been a couple months since our last update post, excluding the previous post of revealing Asteric, Minhaga, King Archon, and the Kingdom of Velare. Before we dive in, we wanted to quickly share about our experience at Cedarville’s Video Game Exhibition.
Our Booth
We got to meet / talk with hundreds of individuals interested / excited about the game. We had between 10 – 20 folks play the game. One, who played for 2.5 hours. He went to classes and came back wanting to play more! The experience was overwhelmingly positive and overall we’re more confident then ever that Violet is going places! Thanks again for all of those who played and / or checked out the game! We appreciate all of the support and making my (Dan‘s) childhood dream more of a reality!
One of our favorite shotsAnother group of people watching!
And in case anyone who was at the exhibition is wondering… yes, we did do our drawing and Joslyn was the winner of the $50 Amazon Gift Card. Congratulations! Alright, now onto actual game updates.
Cedarville Feedback
One advantage of doing a showcase is watching people play in real time, which results in finding out all of the things that work, as well as the things that don’t. We’re happy to say that of all of the features actually completed, most of it did work. But there were a few things we have adjusted.
We noticed that people didn’t notice the lock gate in the very first room of the cave. Once they obtained the key, they didn’t know where to progress from there. We first made the room layout one tile smaller all around, making the locked gate more visible. Secondly, since we wanted the player to learn how to pick up things in that first room, we decided to rearrange the random arrangement of rocks into an arrow formation, pointing at the gate.
Updated Tutorial Cave
The player will more instinctively check out the locked gate, finding out they need a key to pass. Five minutes later when they get the key, the player will remember this moment and remember to go back.
Another Tutorial Cave item we addressed was learning the agile weapons. We noticed that a player opened the chest and used the agile weapon once, then switched back to their balanced weapon. Well the code, via the designer (i.e Dan), assumed the player would check out the agile weapon for five seconds and then globs would drop from the ceiling. This assumption was remedied by adding agile switches to the wall, something we were planning on doing for dungeons anyway.
Agile Switches
Now the player is forced to use an agile weapon to activate the switch, which in turn drops the Globs from the ceiling. It’s much better designed and teaches the player more organically as well.
We also addressed four other smaller items:
We have noticed for a while that collisions with the agile weapon while facing left / right visually didn’t work. It became more apparent while showcasing that this needed to be fixed.
Players would defeat the final enemy, which would drop their weapon, but right near a chest. Dropped weapons had a higher priority of picking up than opening a chest, which was really frustrating for players.
After the tutorial, in the first loop sequence of the game, players (who we assume weren’t super familiar with Zelda conventions) didn’t realize they could push a block onto a switch. We addressed this by teaching the player in three steps. The first a simple step switch, which they will be lured to by a certain character singing. The second, another step switch, but this time doesn’t function until a block is pushed on, which there just so happens to be one in eye sight. The third, the original puzzle, but with a slight twist.
A dropped weapon would halt movement of a player from pushing / pulling blocks. Much like the chest priority issue, this was frustrating because the only remedy was to pick up a weapon. But, if the inventory was full for a weapon, the player would have to go into their inventory, drop a weapon, pick up the weapon that was in the way (which they probably didn’t want in the first place), and then continue pushing / pulling.
Castle of Castle Town
We decided to finally get around to finishing the art for the Castle and the Court Yard (where The Remembrance ceremony takes place). We unfortunately didn’t have this ready for the showcase, but for those who remember the cutscene, this should look so much better now. Tony did a great job, as always, fully realizing what we were going for.
We also updated the rain / snow particles. We got a lot of good feedback of showing the Violets in action in video form, so we plan on making this a regular occurrence. Below are those particles in action:
We still need to adjust the depth of the particles, but overall, they turned out great!
We also worked on a waterfall effect, which can be seen below:
We still need to address that hardline seam between biomes, but that’s a task for a different day!
Overworld Night Music
Tyler is still composing from time to time. The reason there hasn’t been much done on this front is it is hard to compose for something when the art isn’t final. Well, now that we have much of the art complete, we have restarted and are going in big. Below is one sample:
Overworld Night
Map Updates
This is still a work in progress, but we made enough of a dent in this feature that it seemed worth sharing. We added compasses to maps! There are three types of compasses:
Compasses that function without needing a map for an area
Compasses that only work with a map for a given area
Custom Compasses, that can be set by the player
Updated Map
All compasses, by hovering over it and pressing A, can toggle a waypoint. When a waypoint is on, the compass will remain on the minimap, albeit it on the edge. We can actually see these functioning in the waterfall video above.
In the screenshot above, the chest that is currently hovered is a custom compass we set. These can also be removed by pressing X. Pressing A anywhere on the map that doesn’t contain a compass will bring up a menu to set a new custom compass.
The art was made by Dan, so it is a bit rough still, but functionally it is working great! Oh, speaking of functionality, we also let the player quickly select between compasses by pressing the Dpad.
Other Notable Updates
NPC and doors now have scheduled active times, which can be set individually. NPC characters can also have different text if you stay on screen with them while their active time expires.
Our Input Recorder now captures certain keyboard keys for Playback. This is so, if we “cheat” during our session, our playback will “cheat” as well.
In our previous update post, we talked about adding generic NPCs. We also added stun and idle animations as well.
To make merging more streamlined, at the very beginning, enemies will spawn with only one type of weapon for a given weapon type. As the player’s max inventory increases for a given weapon type, enemies will be able to spawn with more variety. To accomplish this, we created a function called change_weapon_on, which was using Game Maker Studio’s instance_change function. Long story short, we believe there is a severe problem with this function which causes some intermittent problems after hours of play. See my bug report and this thread if interested in more details! To fix it this, we decided to not be lazy (i.e. using instance_change) and manually “do the change” ourselves.
Our Adviser has also been playing the game and providing feedback. At the time, these polish items were low hanging fruit items that were quick to fix and would help make the showcase that much better. Below is a screenshot:
Polishes
Lastly, we eased the pain of falling into a hole. Before, there was a pretty extreme force that sucks the player into the hole. Though we still wanted force to make the feeling of falling into a hole, we understood the feedback. Therefore, we made the force not as strong, added a sound and visual effect that hints at the player that “this is not a good idea to continue standing here”. The first time this happens, the player probably won’t react fast enough to do anything about it. But with sequential hole collisions, the force not being as strong and the added sfx / vfx should help the player escape falling into a hole much easier.
We have been given the opportunity to showcase Violet at Cedarville’s Video Game Exhibition Friday, December 8th from 11am to 4pm in the lower lobby of the SSC (Stevens Student Center)! We are beyond excited for this opportunity to show Violet off in its first public venue. If you are in the area and have the time, come swing by!
As we have hinted at, with the past few months we have begun integrating story elements into the actual gameplay, which have been privileged information up to this point. With this opportunity and keeping development on track for a future Kickstarter, we decided it would be in the best interest to not remove any of the story data.
Therefore, it was decided to give our current followers the first look at story elements, before the public at large sees it. Up until now, we have been very careful about not spoiling any names / locations / etc. In fact, we’d even gone as far to reupload files to mask the names of characters. We are very excited to not have to do this anymore!
We should note that what we are revealing will not spoil any of the major story elements (i.e. this will be what we reveal in promotional material in the future / the first cutscene or two of the game). Before we begin, let us introduce you to our writer.
Writer
It is our pleasure to introduce our writer, Kennedy Jewett. We originally had a great story outline in late 2018 / 2019 and ironically, it involved a pandemic. Then, an actual real world pandemic hit. We decided it was in the best interest to rewrite this story outline to “get away” from a pandemic idea. Therefore, Kennedy has been able to transform the original story beats into something entirely new, while maintaining the essence of the original story / gameplay that we were wanting. Kennedy will be responsible for writing and maintaining the high level story, characters, and continuity. We are excited for what she can bring to the project!
Without further ado, let us take you to the world of Velare.
Velare
Velare Royal Crest
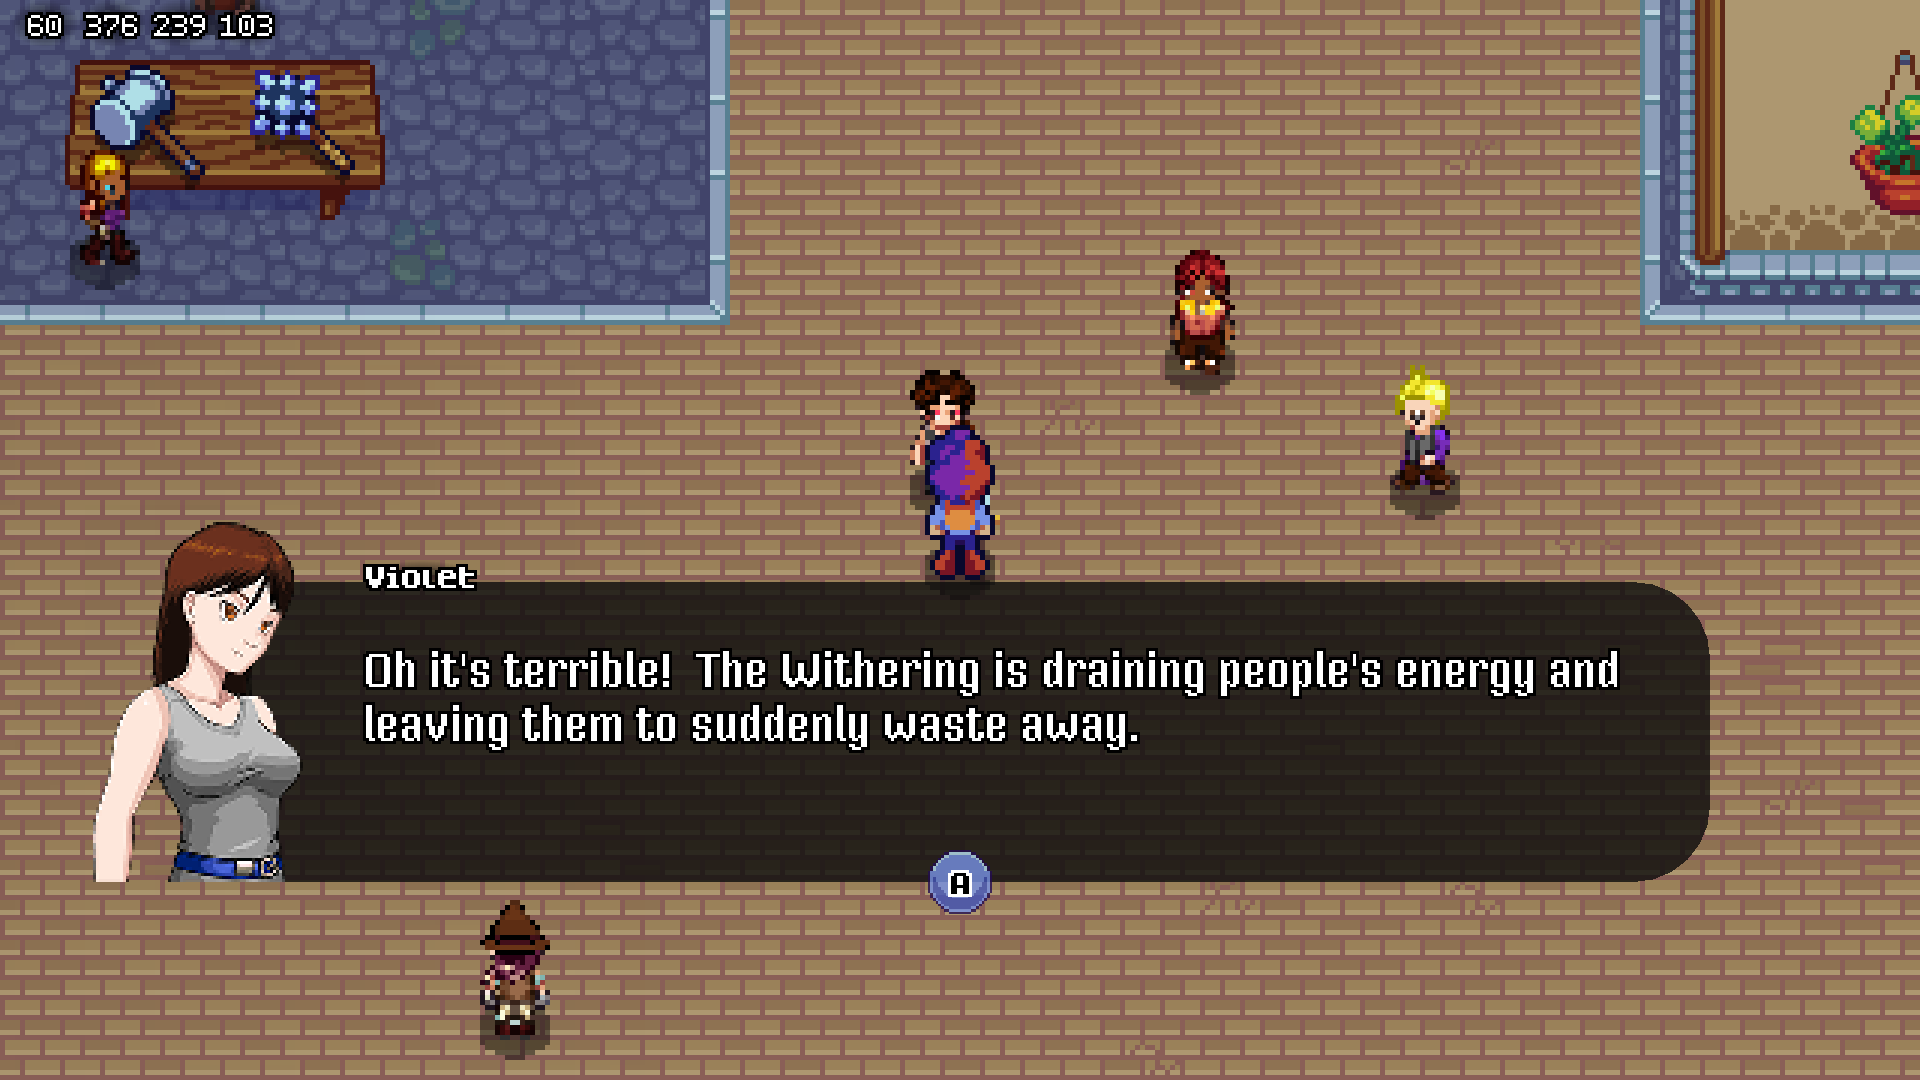
There once was a time when Velare knew only love and prosperity. For hundreds of years, men and creatures lived in tandem. But at some point, darkness overcame civilization and turned clans against one another. This corruption led to a deadly war in Velare, which came to be known as “The Withering”, which resulted in the darkness being banished.
The Velareans who resisted the darkness remained in Velare and were tasked to rebuild the kingdom, but the beasts who became corrupt were banished from the land never to return. The rebuilding of Velare was very successful. The Velareans created a solemn holiday called Remembrance where citizens from all across the land would travel to Castletown to remember their fallen ancestors. But overtime, knowledge of the Withering became lost and forgotten, and Remembrance became an empty ritual.
With the passing of each generation, royal responsibilities were neglected and knowledge forgotten. Forty generations had passed by the time Archon is king, and it was normal for the royal family to hire laborers to take on royal responsibilities.
Minhaga
Minhaga
Minhaga is a local botanist / alchemist and is one of the outside hires who loves to experiment. Upon King Archon’s coronation, he appoints Minhaga to be the official overseer of the royal family’s gardens.
On the Eve of Remembrance, King Archon’s son fell severely ill. King Archon issued a decree that if anyone could find a remedy to heal his son, they would be rewarded beyond their wildest dreams.
Minhaga resonated with the king, because Minhaga’s own son was also very sick and he was already trying to find a cure. During one of Minhaga’s garden observations, he began to notice similar regenerative properties between Velarean herbal remedies and Violets. The king’s decree for a remedy forces Minhaga’s hand; he uproots four Violets and transports them to the palace to present to King Archon at Remembrance.
Asteric
Asteric
Asteric is a young man, around sixteen years old, who acts as a regional courier. However, Asteric has always wanted to be a soldier for Velare. Asteric, who is always dreaming, accidently oversleeps on the day of Remembrance and becomes extremely late for the ceremony.
As Asteric is arriving late to the Remembrance Ceremony, he witnesses Minhaga present something to King Archon. All of the sudden, chaos comes out of nowhere and the crowd starts panicking. Without Asteric realizing, Minhaga was presenting his potential remedy for the sickness that ailed the prince. As Minhaga and King Archon are observing the remedy, the Violets grow quickly and viciously turn on them and all who are around them.
Asteric takes it upon himself to fight against the Violets to prove that he can be a soldier in Velare. Will Asteric be able to fight off the vicious Violets to finally prove his skill, or will he become another casualty?
It seems like yesterday was the end of September, and now it is the end of October! We’re sorry for the delay in posting. The good news is we have a lot to share!
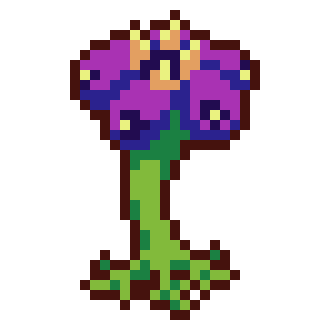
The Violets
We are excited to finally share the titular enemy, the Violets. This was one item that was mostly completed around the end of July, but had a few more polishing items to finish. Thus, we decided to wait to share in this post!
As mentioned 5 years ago in the about post, the Violets behavior is similar to the splitting and combining of the game agar.io. The Violets in their defensive form have no concept of good or evil. They have one task: to defend at all costs. Violets survival is completely based on feeding off of their enemy to grow bigger. The larger the Violet, the more health it has. The problem is, the bigger the Violet, the slower it moves. Thus, they attack when a threat is nearby by splitting off, thus getting smaller and can move quicker. When Violets take damage, they also shrink in size. Violets like to group together to swarm their enemy. When same sized Violets group together, they can combine to grow bigger (albeit being slow again, but having more health). The AI of the Violets makes them the deadliest of foes, similar to how Metroids are for the Metroid series. The Violets pose a huge threat if they are not properly handled.
As the title of this posts insinuates, the Violets are completed functionally and artistically! Tony did a great job capturing what we were wanting in designing the Violets. Below are a few design concepts:
We ended up combining designs 1 and 2 which produced these designs, ordered from oldest to final:
Merged DesignPolish DesignFinal Design
As mentioned, the Violets have variety of sizes. Thus, we had to design all of the different animations around the many different sizes. We aren’t going to share all the different sizes or animations. However, we did want to share our first public screen capture, demonstrating the Violets in action:
I (Dan) make light work of destroying the Violets. But keep in mind, I have a lot of health here, with all the best weapons in the game! Playing the demo of the game will demonstrate just how deadly these Violets are!
Concept Artist
Also at the cusp of the last post, we were working on getting a concept artist to design a few of our characters. It is our pleasure to introduce our newest team member, Corinne Schwallie. Corinne is a freelance concept artist based in Ohio with a few years of concepting passion projects. She has already brought a few of our characters to life so far (which we will be showcasing in a future post) and we’re excited to see what else she can bring to the table! We are excited for what her talents will do for the project.
New Items
Below are a few more items that can be picked up during the game:
LanternTelescopeSkull Pendant
We also decided that consumable healing food comes from Globs in this world. Below are those items:
Each of these “Gluits” are native to specific provinces in the world. For example, globs will drop Glushrooms in the swamp province.
Tutorial and Fog
We made some updates to what we’re calling the “tutorial border” as well as fog in the game:
TutorialFog
NPC Updates
One of the biggest updates we have done to the game in the month of October was updating our NPC‘s art. Though we haven’t done most of the main characters, we did create all of the “bit” characters. You maybe wondering “I know the team is making progress on the game, but making hundreds of animations for bit characters vs. the ratio that you have been creating enemies / etc., there is no-way!?” And you’d be right — except we didn’t create our bit characters the same way as everything else. We created a layering system.
We ended up creating an almost bare base, which then we can layer on hair, beards, and clothing. We created six bases: adult male, chubby adult male, adult female, chubby adult female, child male and child female. With these bases, we can palette swap skin tone. With the clothing layer, Tony drew these in such a way where each color distinguishes a part of clothing (e.g sleeves, chest, pants). We can then palette swap the clothing to make the character have many different variations of clothing types. Beards and hair had to be created distinctly for each type of hair / beard style. But, we can palette swap hair colors easily. With all of these different layering / body types / skin colors / hair colors / hair types / etc., we are able to make thousands of different variations for our bit characters.
Below is a screenshot with some of them:
New NPCs
In addition, we also updated the dialog for these characters to reflect the direction of the story as well as new game updates.
Game Design
There have been some additional game mechanics the last couple of months, as well as some tweaks to existing systems.
The first is the ability to learn new combat skills. Before this, the player had essentially “all of the best combat skills” from the start. But we asked a main question: “what if we limited the amount of swings / thrusts a player can do?”. Which led into these questions: “How does that change the game? Will the game feel unbalanced or just feel ‘bad’?” Strangely, the game didn’t feel bad or unbalanced. In fact, it felt good to learn these “new skills”, and made progression feel all that more rewarding. In our opinion, it changed the game for the better. But, we had to figure out a way to “unlock” learning these moves.
Originally, before the real tutorial was implemented, the Dojo master “taught” the player a few of the moves / skills / etc. as the tutorial. Now, we have the Dojo master teach the player these new skills by trading in Skull Pendants (the icon shown above in the `New Items` section). These Skull Pendants can be obtained by clearing out forts of enemies. Essentially, the player is proving to the Dojo master the mastery of their skills and the Dojo master rewards the player by learning (or unlocking) the new skills.
The second update is better weapon assignment to our Soldier enemies. Before, they were all randomly generated. Now, we can specify what type of weapon they carry. For those type of Soldier enemies that are still random, we limited the amount of randomness based on the player’s inventory size for that type of weapon. For example, if the player has only two capacity for balanced weapons, Soldier enemies that are of balanced weapons type can only have Sword. However, if the player’s balanced weapons capacity increases to three, Soldier enemies that are of balanced weapons type can randomly choose Sword or Rapier.
What this helps with is the weapon merging mechanic. When we decreased the capacity, we noticed a lot of players not merging or picking up weapons because the weapons were all sorts of different. Now with enemies dropping more common weapons, the player is more easily able to merge their weapons. So essentially, the greater the capacity, the more available weapons that are out there randomly. We still can assign weapon assignment specifically to Soldier enemies. So, we could still add weapons that aren’t in the random selection pool, giving some mystic / value to the player.
The third is overhauling our enemies hearing system. Before we started adding sound effects to the game, the way an enemy “heard” the player was by how fast the main character was moving. This had a lot of limitations, but worked for us very well early on in development. But with all the newly added sound effects, this system was severely outdated. Thus, we decided to overhaul the hearing system. The good news is the properties that the enemy determined if they “heard” the player moving was all reusable. For example, each enemy had a hearDist property, which is how far an enemy can hear something. So if the player was moving so fast within the hearDist property, then the enemy could hear the player.
When updating our hearing system, we wanted to replace “how fast the character is moving” with “what sounds are being played, where at and how loud”. “What sounds” are being played was relatively easy, we cached the sound until it is no longer playing. “Where at” was relatively easy as well. We keep track of the starting position when the sound is played. If the sound is attached to a moving object (like an arrow), we can get its current location as well. “How loud” was an interesting problem to solve for. We didn’t want to use the playback volume for a given sound effect, since that is relative to the human player / mixed with all the other sounds / music. Therefore, we assigned a “loudness” property to each sound effect using this hearing system. There are five thresholds: quiet, noise, normal, moderate, and loud. Quiet / noise sounds are like footsteps, Normal sounds are like speaking volume, Moderate / Loud sounds are like things breaking / explosions. With these relative volumes, we can not only make use of our hearDist property on our enemies, but also “gate” quieter sounds for enemies with bad hearing. This system is very simple but also provides robust amounts of enemy configurations.
Other Notable Updates
One other feature we had mostly completed at the cusp of the last post was a cutscene / sequence system. In our minds, a cutscene is just a sequence of scripted events that should happen. Therefore, what was really at play was a sequence system. We wanted this sequence system to handle not only the aforementioned cutscene problem, but something like “when a block is moved onto a switch, pan the camera to the gate, show it unlocking, pan the camera back”.
Interestingly, Game Maker Studio just released a sequence creator as a feature (which is partially why we waited so long to implement this). However, there were some limitations of Game Maker’s sequence creator with our engine that we won’t get into here. Therefore, we rolled out our own solution.
To solve for this, we added to our global object a function called addSequence that registers a callback, or a list of actions that should run. The instance that registers the function can then run that sequence when it is ready, or use another function called runSequenceWhen that provides a logic callback. When that logic callback is true (e.g. “a block is on a switch”), the sequence will then run. There can be multiple sequences ran sequentially, as addSequence takes a time delay of when the next sequence should run. In our above example, “pan the camera to the gate” takes some time to actually happen. We don’t want to run “show it unlocking” until a certain amount of time has passed for the camera to get to the gate (or we could use another runSequenceWhen the camera is in position, but just illustrating a point). We also have a few other helper functions, like sequenceHasRan, which checks to see if a given sequence has ran already, as well as pauseSequenceWhen, which pauses a running sequence when a certain logic callback is true.
This system has a few other bells and whistles that the average reader probably won’t want us getting into the weeds of. But this sequence system is going to be the backbone of mainly other systems to come.
Below are the remaining notable updates:
We found another issue with our Recorder / Playback system for watching a player’s session / debugging. We found out that the audio system in Game Maker is asynchronous. Well, we knew it was asynchronous, but we didn’t realize it was affecting our recording / playback system until now. The Game Maker Studio functions audio_is_playing and even more specifically audio_sound_get_track_position are not guaranteed to be the same each playback (due to computers running different tasks on each playthrough). Therefore, we added functionality in our Recorder to capture these values so that our Playback can return these values as they were for a given session.
We made some updates to our map generator. In our last post, we mentioned that we had begun building the real game world. Our old map was out-of-date, but we haven’t made updates to the map generator in a while. Therefore, we spent some time updating our map generator to account for all the different new things (e.g. TileLayer system).
We fixed some issues with our moveable blocks introduced in our last post. There was some snapping issues / moving through blocks if the player positioned themselves correctly (or incorrectly).
Since we added a concept of moveable blocks, it only made sense to have these moveable blocks be pushed on a switch. We therefore made some adjustments to our gates to be able to go from an unlocked state back to a lock state (e.g. the block was on a switch, and now we moved the block off).
September saw us fixing many, many TODOs. We had up to 110 TODO items. Yes, we’ve been a bit busy adding new features that we haven’t really refactored much. Now we’re down to about 45, the majority related to updating old sprites with new ones.
We also have been doing a lot of play testing. This is because we are getting demos out to a few people to help with the future Kickstarter.
Because we are going to start handing out the demos to people, we’ve begun making use of tagging / releases in Github (where our source code is hosted), for better tracking. We’re going to be creating minor releases from here on out. Along with this, we’ve been essentially committing to one branch this whole time. Now we are getting in better habits of making pull requests for our bugs / issues / features. This helps with tracking / searchability / tagging / releases as well.
After the disappointing month of March, we took some time to recalibrate once again. After a long couple months of silence on our end, we are pleased to announce some long overdue updates. On the name front, we can’t quite reveal this yet (per our lawyer), but we can at least share the good news that we’re still able to use Violets in some capacity!
Even though we had some time of recalibrating, we also can’t deny that the months of May and June have been busy for us outside of this project. As you may know, a little game called The Legend of Zelda: Tears of the Kingdom came out. Being that Tears of the Kingdom (TotK) is a direct sequel to The Legend of Zelda: Breath of the Wild, a game we took a lot of our original inspiration from, it was critical that we took the time necessary to play through and understand what the game was about. Many choices, ideas, and game design moving forward (some which will be covered in this post) was definitely impacted by playing through Nintendo’s latest Zelda game.
Part of the recalibration effort these past couple of months was actually game planning / coming up with the tasks needed to be completed to make our game. All of this planning, especially after TotK coming out was no accident. We are certainly glad that it came out when it did. Giving a review / our opinions of TotK is beyond the scope of this blog. However, our biggest learning as it relates to this project is that there is a sense of traditional Zelda that is no longer present in Breath of the Wild (BotW) / TotK. Perhaps we’ll touch on that topic at a later date. For now though, let’s move on from high level talk and get into the updates!
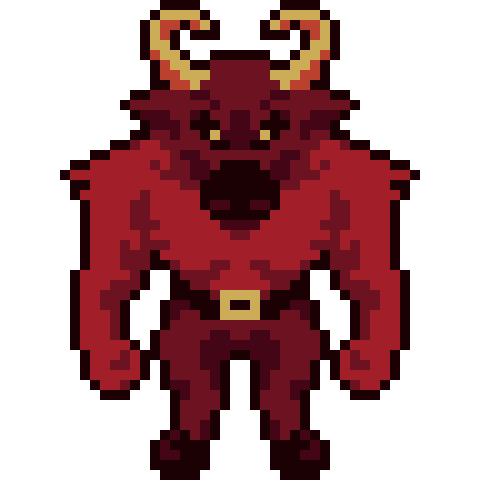
Minotaur Updates
Since we last posted, we shared some Minotaur updates, and we have even more to share below:
Minotaur Balanced Swing UpMinotaur Balanced Swing RightMinotaur Heavy Swing DownMinotaur Heavy Swing Left
The minotaur has extreme strength, and Tony did a great job capturing this with these swings!
Soldier
(Not to be confused with the enemy type Soldier). Castle town contains soldiers that protect the royal family and the population from danger. There’s also a special type of soldier that exists in the game to protect a special place (this is a bit vague, but this is the most we can explain for now without spoiling anything)! We wanted to save time and not design two different types of soldiers. Therefore, we made use of the palette swapper and made one version of the solider and swapped different colors to make two different types of soldiers out of one design.
Like anything new, we came up with a couple designs (in pairs) shown below:
We ultimately went with the last design and came up with this final version:
Castle SoldierSpecial Soldier
And we even have some walk and run cycles completed:
Castle Soldier Walk DownSpecial Soldier Walk DownCastle Soldier Walk LeftSpecial Soldier Walk LeftCastle Soldier Run LeftSpecial Soldier Run LeftCastle Soldier Run UpSpecial Soldier Run Up
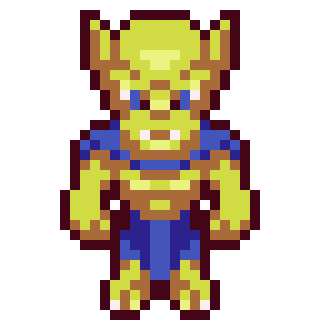
Yellow Enemy Variants
We decided that we needed another variation type that was on the medium difficulty side to help the pace / difficulty curve of the game. Therefore, we added yellow enemy variants, shown below:
Glob YellowAmbush YellowKnight Ghost Fire YellowKnight Ghost Water YellowKnight Ghost Ice YellowOrc YellowReptile YellowMinotaur Yellow
Other Art Updates
Below are a few screenshots of a few other new art assets, including updated glows, signs and icons, boulders, pots and moveable blocks!
Boulder and Glow SizesSign PostHouse IconHolding PotMoveable Blocks
Game Design
One of major items we have been working on the past month is nailing down the answer to the question “What is Violet”? As mentioned in the introduction of this post, one of our learnings of playing the latest two Zelda entries was that the traditional Zelda experience is no longer present. Therefore, we believe in order for this project to standout amongst the vast crowd of games is to separate ourselves as much as possible from the “modern” Zelda formula and really deliver on “the traditional Zelda experience”. To us, this means many things. But to summarize it succinctly, it would be a “simple, progression based, laser-focused scope”.
Over the past month, we’ve began thinking about the design of the game. We’ve been brainstorming different collectibles, where they exist, why they are collected, etc. We’ve been deciding what areas we want to build in the game, why they exist, what purpose they serve in the game, etc. We’ve been thinking through what additional mechanics should be in the game, how they are obtained, for what reason do they serve, etc. Basically, we’ve been determining the purpose of the game. Originally the plan was to make this game a huge, 2D, open-world adventure. After playing TotK, I (Dan) don’t think bigger is always better. Therefore, we decided to get “laser-focused” on the areas we want to create and make sure these areas are full with fun, unique, and engaging content.
As discussed in our previous post, we pushed back the Kickstarter date. Part of these past couple months was actually beginning to build out the actual world. Before the events of the previous post, we were planning on making a Kickstarter demo that would throw away the world we’ve created. In order to deliver the project in a timely manner, we decided it would be better to create part of the world for the demo, that would be refined as development continues.
Before our previous post, we were experimenting with the actual world and how big it was going to be. The original world was going to be 18×18 sections (a section originally contained 6×6 zones and a zone was 480x480px). We even started building castle town, which was going to be 2×2 sections large! After realizing we needed to make this game smaller in scope, we ironically, we went back to the room size of the original Kickstarter demo, which was 9×9 sections. However, we found that to be a bit small (mainly with the fact that houses / dungeons / caves / etc. are as big on the inside as they are on the outside (breaking a convention here)). With the math involved, there wasn’t a divisible way to have an in-between size that encompassed 3×3 provinces (a province would contain n number of sections) with 81 sections that we were wanting. However, a thought eventually popped into our heads of “what if we made the sections contain 8×8 zones”? This made the original Kickstarter grid of 9×9 sections not feel as small anymore, while the world also didn’t feel too large either. Essentially, making the sections contain 8×8 zones made our 9×9 section grid feel like an original 12×12 section grid (6×6 zones), but utilizing the 3×3 provinces that we wanted from a world building standpoint.
Concurrently with building out new sections, we’ve also been coming up with the scope for the game. This has been a long and hard process. Much of the reason why this has been hard is that determining what should be cut, and what should be kept is painful. Up until now in my career, I (Dan) have always been on the other side of the conversation when it comes to cutting things. It’s much easier to say “no” when it isn’t ultimately your product. However, now being in the role of “the client”, it’s really hard to remove good ideas, for the sake of time and budget. With that said, getting “laser-focused” on what we are building will ultimately be for the best of the game. We’ve had a vision for the game (and honestly, we really haven’t strayed too far from this vision), but haven’t had any need for boundaries or rails up until this point. But with time and money entering the picture, it’s very important to put into words what this definition of the game will be, and of course, sticking to it!
Coming up with the scope of the game has also been tedious. We currently have notes and ideas in many different places. We’ve had to do a lot of consolidating on our part!
One of the more tedious parts was determining what resources (items) we wanted. We originally were planning on having many droppable resources with a few different inventories to organize them. However, a common shared complaint in TotK, was the cluttered, and annoying to sort through inventory system. Part of the problem in our opinion is that there is just too much stuff in that game. Therefore, we decided to scale back what was collected and why. For example, we were going to have resources in the game that served multiple purposes. Instead, we decided to give a resource one purpose, which makes the game “simple” and “laser-focused”. A good example of this is we decided to combine the Fire, Ice and Water Cores into one Element Ore that can be used as ammunition for the elemental rods. We originally wanted the ability to have the Fire Core be used for Fire Rods, as well as other purposes. But, cutting this idea in favor of removing extra clutter will help streamline the game.
Other Notable Updates
It’s been satisfying to start designing the game now that we have many of the game’s systems developed. We still have a lot more design / work to do, but we’re getting closer each step of the way! Below are a list of other updates we’ve worked on:
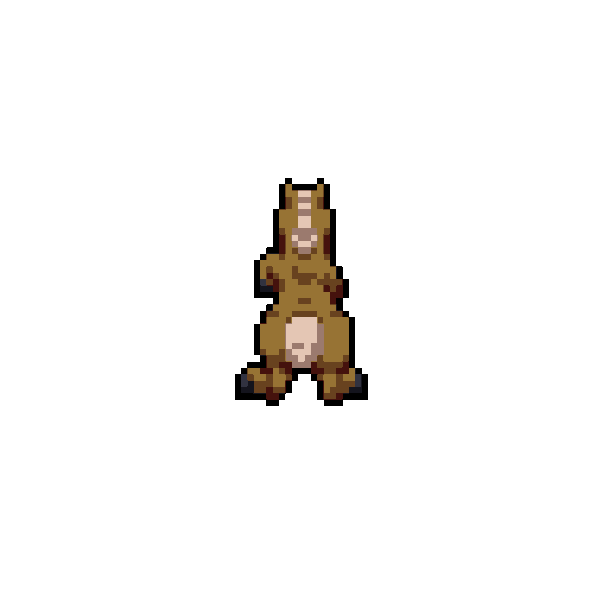
Since we have another year of development, we finished worked on the horse from a functionality standpoint, and it works great! Now we hope we’ll have enough time to implement the art for the Kickstarter demo for the player to be able to ride horses!
We mentioned yellow enemy variants above. With that addition came increasing the highest ranking from S to SS. Now the ranking is as follows: F, E, D, C, B, A, S, SS.
As we were building new Castle Town, one thing we thought was “wouldn’t be cool if we could get on the roofs, jump off of them, etc.?” So, we decided to implement that feature. It required some updates to our tileLayer system, but it ended up being for the better. For example, one thing we realized was house walls were acting much like cliffs! Therefore, we refactored house tile layer into the cliffs, and cleaned up a bunch of unnecessary systems around that.
Jumping Off Roof
Along with our tileLayer system updates, we also added two other types of tiles: holes and shallow water.
We added a No Controller Dialog (to help the player know if their controller is connected):
No Controller Dialog
We added a position editor to help us position weapons / items on the Living objects. Before we were doing this manually by going into the art canvas, positioning the sprite there, and manually calculating the offset, and typing it into the code. Now we have a debug in-game editor that does all of this and outputs a json file with this data:
Debug Position Editor
You may have noticed that the HUD contains icons for the L / R Shoulder buttons now. We decided to combine rods as a group of weapons (much like balanced or agile is its own group). We also found that it was easier to not swapped the “Dpad pages” with the shoulder buttons. Therefore, we assigned the rod / special weapon selection to the shoulder buttons.
We overhauled our buildings system (inside a house, cave, etc.). In this post, we mentioned that buildings being as big on the outside as they are on the inside. To make this work, the “inside” of a building exists in the same game room as the outside. Therefore, we need a way to determine when a Interactable object is inside or outside. The old way of making this work was to draw primitives that created tris (triangles), and these tris would create rectangles, or tiles that we could use to determine if something was inside. Here’s a simple example:
Primitive
If you look closely at the red line, it makes two triangles, which form a rectangle. Pretty neat. But, what if we have a complicated building, or a cave system like below:
Primitive
This creates all the rectangles we need, but is an utter mess to maintain. For example, as we were designing this cave system, we changed the layout multiple times, which required us to update this primitive. We decided that this needed to be simplified. Now, if we want to create a building, we basically lay down a tile overlay of what the boundaries should be:
Building
It’s quick to update and easy to maintain. We had to write some code around how to actually interpret these tiles to create actual “insides”. But now that this work is done, creating additional buildings, cave systems, etc. will be a breeze.
Conclusion
We recognize it’s been a while since our last post and we appreciate the patience! We’re hoping we can share some bigger news in our next few posts. You know… things like what the story is, the name of the game, what our characters name is, who the villain is, and some art of different things that we haven’t been able to share yet. Stay tuned!
Last Year we shared our plans about Violet from a logistical front. The TL;DR of our post was we’d be shooting for a Kickstarter in February 2024. And unfortunately we have some bad news:
Our original, high level plan was to launch our Kickstarter in February 2024. I (Dan) would continue working full time until January 2025 where we’d develop the game for two full years. In 2027, we’d polish the game and release. After meeting with the advisor, it was encouraged for us to set a lower target dollar amount, as well as to spend less time post Kickstarter developing the game. With less budget and less time (the double whammy), we decided to postpone the Kickstarter. Though we know we’d have a good demo / be ready by Kickstarter in 2024, my (Dan’s) gut was telling me to wait another year (2025) for personal financial reasons.
Above everything else, I (Dan) need to make sure my family is provided for. And second, I want to make sure those involved on the project don’t have to worry about if / when they are getting paid. This is a big risk and I need to make sure everyone involved can get through two years without my full time salary. Of course this is disappointing, but I think the pros might be better in the long run (I always say slow and steady wins the race). For one, this gives us another year of development / design / art, which should help reduce time post Kickstarter developing the game. It also means we naturally wouldn’t need as much from a Kickstarter, making a lower target actually workable from a budget standpoint. And obviously, one more year will make the demo even that much better.
From a logistic standpoint, the timeline stays the same, but we are just shifting the Kickstarter out a year. The Violet team was graciously more than accepting with postponing the Kickstarter.
However, the “bad news bears” doesn’t stop there:
Shortly after we decided to push the Kickstarter out, our lawyer informed us that not only is Last Life Studios (the LLC I (Dan) am operating under) is trademarked, the game name of “Violet” is also already trademarked. Essentially what this means is the name of the game is going to have change, as well as some of the branding we have developed (e.g. the website, violetthegame.com, our logo, etc.).
March has not been a good month for Violet. It has really got me (Dan) discouraged. Tony, our artist did give me a little encouragement and said “For what it’s worth, those are all normal setbacks. If it means anything, none of those have discouraged my faith in the project.” The next couple of months will be a bit of a rebranding time, so we may go a bit silent as we try to figure out what to rename / rebrand too.
Setbacks yield pruning, and then growth. Right now the pruning phase sucks. But we believe the growth will be exponential.
This is another one of those hodgepodge of updates posts. However, we already named a post “A Hodgepodge of Updates”. Therefore, we decided to name the post with one of the main new features we added in the last couple of months — the beginning of the game (i.e. the tutorial)!
I (Dan) hate tutorials in games. I’m the type of gamer who just wants to play the game and figure things out on my own. Therefore, we made the tutorial succinct and to the point (and there’s even a way to quit early if an experienced player knows how!). We believe the tutorial shows the game loop well, while explaining the basics of the game. The best thing to do is experience it for yourself! Until then, a few screenshots will have to do:
TutorialTutorial
TutorialTutorialTutorial
A couple of other updates you may have noticed in the most recent build of the game:
The minimap icons have been updated.
We have a cave tileset, with a looping cave texture that repeats for those “out of bounds” areas (i.e. the void).
We added a concept of gates and locks, which require unlocking by clearing out enemies, a key, or by some other means.
We added hit effects (slashes) as well as changed the damage color an enemy takes. This in turn means we removed the blood particle effect.
We also added many UI sound effects to help the player know which buttons / inputs are being pressed / used! Unfortunately, those are not observable with these screenshots.
Minotaur Updates
We made quite a bit of progress on the Minotaur these past couple of months. Firstly, the Minotaur dying:
Minotaur Death DownMinotaur Death Left
Next, we’ll showcase the Minotaur’s dash attack:
Minotaur Dash LeftMinotaur Dash Up
As usual, progress can create setbacks. After we created our stun animations and tested with a few players, we realized the startup of both the dash attack (as seen above) and the stun animation were very similar, causing players to be confused whether the Minotaur was going to attack or be vulnerable. I (Dan) personally don’t like in games when an enemies telegraphed animation is similar — especially in making split second decisions. So, sympathetically, we decided to change all of our stun animations to correct this problem. Below is an old version (which we’ll see how similar it is to the left dash attacks above):
Old Minotaur Stunned Left
And below is the current, updated Minotaur stunned animation:
Minotaur Stunned LeftMinotaur Stunned Down
Other Art Updates
While taking a break from the Minotaur, we also did a lot of color and effect updates. We’ve mentioned some of these updates already (the slash effects). Therefore, the rest of this section will show off the remaining updates:
Clouds and cloud colors
We removed the cloud effect particle and replaced it with our own “cloud particle”. We won’t go into all the details of how the clouds work, but we will show off a few updated screenshots:
Single Cloud Sunny DayCloudy DayCloudy Day Inside
When it is sunny, clouds will cast a nice, dark blue shadow. When it is cloudy, these colors become a mix between a nice dark blue and a cloudy gray. Inside, we change the void color to be a mix between dark brown and cloudy gray. That is a great segue into:
The Void Color
When we are inside a building, and we don’t have a texture, we will use a void color. This color used to be black, but we decided to give it a little flavor, depending on the building. For example, when we are inside a house, we get this nice dark brown:
Inside House Void Color
As we saw above, when it is cloudy, we mix the two colors. When it is night, we replace the void color with our night time dark blue:
Inside House Nighttime Void Color
This is a good segue into:
The Nighttime Color
Much like the void color, we were using black to represent night time. However, we changed this color to be a dark blue as shown below:
Nighttime
The difference is night and day… or, comparatively between some of our other nighttime screenshots, more pleasant looking.
Removed the Fort Fog
Fort fog was one of those things we added very early in development with Violet to test being “inside a building”, before we actually had artwork for buildings. Now that we have buildings and concepts of being inside / outside, we decided to remove the fort fog. The difference is night and day:
FortFort
Cliff Decor
Finally, we added some random decor to the cliffs to give it a little less of a pattern look:
Cliff Decor
Other Notable Updates
Unlike our two recent posts, there isn’t as much to share in detail within this section. Below is our bulleted list:
Performance Increases. These past few months have increased performance in our game dramatically. We added a couple of optimizations as well as a few fixes. For the first time in a while, I (Dan) feel proud to show off the game.
Slow Motion Debugging. We came across a function game_set_speed that let’s us toggle the framerate at which the game is running. Before, we’d change this value in the game settings if we needed to see if animations we’re running correctly / at the correct speeds / etc. However, running at 2 frames per second made this very cumbersome to test. With this find, we can toggle the framerate at the moment we need to!
Fix Playback Input. With the updates to our path finding, we broke quite a bit with the input recorder / playback. We finally got around to fixing this (again). It was really cool to “watch” someone play through the tutorial without having to sit next to them!
Made Picking Up “A Too Heavy Object” Not as Punishable. One thing that was frustrating me and other players was that if A were pressed to try to pick up a dropped item, and instead we were close enough to an enemy, we’d try to pick them up instead! The game would not let the player move until the “too heavy” animation was done. For really heavy enemies, this could last a couple of seconds, where the player would then get punished. We made this so the player could “interrupt early” by simply moving during any “too heavy” animations. That way if an accidental A press occurs, they won’t be punished by it.
These past couple months have seen many art updates, font cleanup, stability fixes and performance increases. We’re excited to showcase the highlights below.
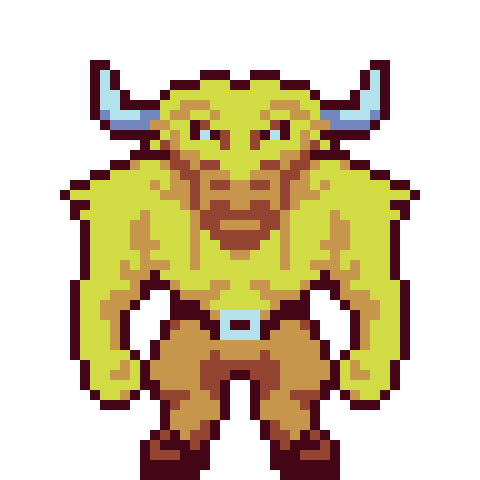
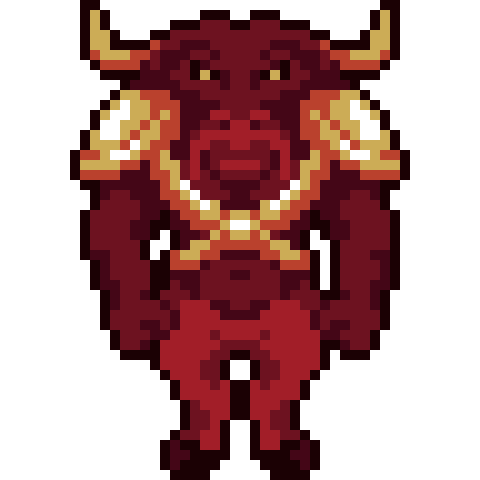
Minotaur
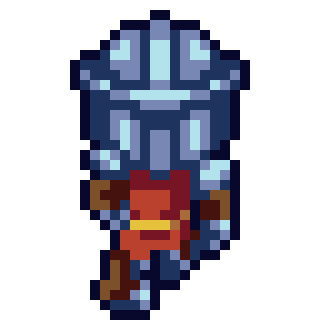
At the beginning of 2023, we began coming up with a few designs for the newest member of the Soldier enemies, the Minotaur. Tony, as always, comes up with several great designs that we then have to decide which fits best with the game, story, etc. Below are a few of the initial designs:
Minotaur Design 1
Minotaur Design 2
Minotaur Design 3
Minotaur Design 4
Without going into all of our rationale, we decided to go with the head of the second design and the body of the first design. This yielded the fifth design:
Minotaur Design 5
After some further tweaking, we ended up with our final design:
Minotaur
The Minotaur has more HP and strength compared to the Orc and the Reptile. To illustrate this from a gameplay perspective, we decided to make the Minotaur significantly larger. We originally went with 1.5 times larger, but that seemed a bit large comparatively. We also tried 1.25 times larger, but that seemed a bit small. Therefore, at about 1.33 times, the Minotaur stands tall at 42 pixels (our hero is 32 pixels for reference (~5’9″)). We also wanted to showcase the strength with its intimidating walk cycle, as shown below:
Minotaur Walk DownMinotaur Walk LeftMinotaur Walk Up
Reptile Updates
December found us finishing up some Reptile animations with the bow and two-handed walk cycle. However, as we were preparing the Minotaur, we had realized we forgot to do idle animations for the reptile. Below are those animations:
Reptile Idle DownReptile Idle Left
Cliff Updates
We also decided to touch up the cliff walls a bit, as well as add a few palette updates for the cliffs in different biomes shown below:
Upper MountainsSnow Mountains
Target Updates
We finally decided to give an overhaul to the targeting system, both artistically and functionally. Functionally, we added a “pause” concept that would only change the targetable enemies every one second, or when the player made a selection. Even though the computer could calculate accurately which targets were “next”, having them change so rapidly made it really hard for the player to choose. This delay or pause concept really helps in selecting.
Visually, we added three states:
Light blue bracket — the “next” target if we quickly let go of L-Trigger and press it again
Yellow bracket — the current target we are locked on to
Directional arrows — if we press the R-Stick in the direction of the arrow, that enemy will become the “next” target
Below is an illustration of what this looks like:
Orc Fight
You may have also noticed in the above screenshots that we moved the HUD elements. We haven’t officially decided if we like this, but moving these elements to the corners of the screen really helps with the vertical screen real-estate.
Font Updates
You might have noticed in the above screenshots that the font is much different than before. We overhauled the font systems and used / touched up some elegant pixel art fonts, as showcased below:
Updated FontUpdated Font
Other Notable Updates
Path Finding Part Two
In our previous post, we explained our problems with the path finding / grid system native to Game Maker and our current solution of using our own grid system. By using our own, faster grid system, we also had to use our own implementation of A*, which essentially made us break even with the performance gains (because Game Maker’s mp_grid_path function is impossibly fast). However, we hinted at our backburner task of rolling out the path finding (A*) on a different thread. Game Maker Studio has the ability to pull in from external resources, and we finally got around to offloading the path finding in C++ as well as on a different thread (spoiler, this gave us extreme performance boosts).
I (Dan) finally had a few consecutive days off after Christmas where I was able to dedicate 100% of my time with no interruptions learning how to make external DLLs that Game Maker Studio could then import and make calls out too. The journey was tough — and honestly, I thought it was going to take longer to figure out than it did. Most of our learnings came from these forum posts / guides:
We ended up going with Visual Studio instead of Eclipse, mainly because we already had Visual Studio installed for Game Maker’s YYC compiler. After about the first day, we had a simple “Hello World” program made where we were able to talk to Game Maker and back to the DLL. Day 1 and 2 also saw us converting our A* from GML to C++. I haven’t touched C++ since my college days, so it took a little bit of time to remember how good ole pointers work. After about Day 2, the A* algorithm was able to compute within a main program within the DLL (meaning, it was converted successfully).
Day 3 was the trickiest as we had to convert our aforementioned grid system of the previous blog post to buffers. The only way to send large amounts of data to a DLL is to send the memory address (pointer) of the buffer from Game Maker. Therefore, we had to convert our ds_grids to buffers. Even though this was a pain, buffers are not only faster in Game Maker, but the size in memory was about half, so we inadvertently gained some performance. Day 3 also saw us learning how to use threading properly in C++. Even though native C++ is faster than GML, it still didn’t really make since for us to spend all of these new CPU cycles sending to the DLL if we were still running the A* on the same / main thread as the game. Therefore, we had to figure out how to implement C++ threads.
There were two threading libraries we looked at. The first was pthread, which we ultimately scrapped as it is meant for Unix computers. Though there are ways to make it work on Windows (the eclipse link / we had it kind of working at one point in Visual Studio by importing the pthread library, but eventually gave up) we finally went with thread, which seems like it is native to C++ now. After a few hours of experimenting, we were able to get threads working within C++.
By the fourth day, we were able to successfully send the grid data to the DLL, create a thread, compute the A* path and send the path data back to Game Maker! When I first got the logs of the path data in Game Maker, I screamed at the top of my lungs and scared my wife! A few minutes later, we were able to convert that data so that our Soldier enemies could move again! We also were able to figure out ways to cancel computations / threads in the DLL. For example, if an Orc dies while computing its path, we no longer need to compute the path anymore, since its dead.
Seeing the fruits of this labor paid of majorly. We’re even thinking of moving our boid enemies (Globs, Bats, Violets) so that the computation is also threaded / asynchronous, as we eventually want tens of Violets on screen.
“Asynchronous” Zones
If we recall from previous posts, as our hero / camera moves from one location to another, we load in zones that are slightly off screen the direction we are moving and unload zones that are slightly off screen in the opposite direction. If the whole world was computing all at once, our game’s speed would crawl. In the spirit of async, we decided to make our loading / unloading of zones “asynchronous”. We put asynchronous in quotes because, unlike the aforementioned A* which is truly asynchronous, the loading and unloading of zones is spread (vs. done all at once) amongst several frames. For example, if we need to load in 4 zones, and it has taken more than 500ms to do so, we tell that system “hey, you’re taking a long time. Let’s continue loading the next frame”. So, instead of loading 4 zones in 2000ms (remember, a frame should compute and draw in ~16000ms), we load 1 zone each frame for about 500ms. Since these zones are slightly off screen, there is still no need to worry about a jarring “pop in” effect. By offloading this task to several frames of the game, we are able to prevent stutter slow.
Other Stability Increases
We also improved the frame rate of the game by removing a few particle effects that we were planning on replacing anyway. For example, blood was a particle effect that we don’t believe was getting removed properly. Recently, if an enemy dies, its body remains until the player unloads the zone and then comes back to that zone a few minutes later. However, if the player never returns back to the zone, the body and its particle system remained in memory until the game ended. By removing the particle (we’re eventually going to create a system for handling dead bodies / other objects that linger around like this), this in turned freed up memory, which in turn, frees up the CPU.
We also improved the draw_container routine for the inventory. All other draw_container calls cached the container that is being drawn, except the inventory screen. This was mainly because refactoring this was going to take a bit of time and was easier to just leave alone. However, keeping the inventory from redrawing the container each frame would create hundreds of structs per frame, which would cause memory to spike. Game Maker’s automatic garbage would eventually clean this. However, the amount of time garbage collection has taken on Game Maker’s part has become quite burdensome for Violet recently. Essentially, there have been stutter slow downs, similar to the aforementioned loading / unloading of zones. However, unlike loading / unloading of zones, we don’t control Game Maker’s automatic garbage collector. Therefore, anything we can do to help avoid unnecessary structs / memory on our part we’ve noticed helps keep Game Maker’s garbage collector more stable.
Weapon Degrading / Capacity / Shards
On Christmas Eve, I (Dan) was playing an old build from 2019. I was mainly doing this just to see how far the game had progressed. While playing, I realized a mechanic that functioned differently than it does now. When a weapon degraded, it only moved down by 1 damage point. Though there was nothing in 2019 indicating that it had degraded, it was interesting to play the game with weapons that slowly degraded vs. now where degrades go down a full letter (therefore, like 20 damage points). We began thinking “what if we degraded by a smaller amount”?
We decided to try this theory and liked this so much better. Now, instead of a C ranked weapon dropping to a D, it goes from C to C-, C- to D+ and then D+ to D. We feel this really helps with the damage output in mid-battle. However, with degrading only going down by thirds, the amount of weapon shards (which can be used to increase weapon capacity) had not changed, being way more abundant. We decided to decrease this, as well as decrease the amount hits it takes to degrade a weapon. Therefore, the degrading happens more (but the damage output is not cut has bad), which yield more weapon shards (but not too abundant). With these two new systems at play, we also decided to make starting inventory capacity for each type 2. With more weapon shards, it becomes pretty easy to increase weapon capacity. With the primary mechanic of merging degraded weapons together for better weapons, we feel like we’ve made better a really interesting game loop with the weapon system.
It’s been a bit longer between posts than we were hoping for. I (Dan) usually write these posts on the weekends. But here in development land and in the real world, it has been pretty busy. A couple of quick stories before we proceed:
Two weekends ago, my computer started micro stuttering the game weirdly. At first I thought it might have been something to do with my graphics card. However, after some testing, it was concluded that my hard drive was starting to go bad. More on this story later.
We were able to show the game to some familiar faces who hadn’t seen the game in a couple years, as well as new faces who were seeing the game for the first time. The feedback was amazing as, for the first time, we were able to see a lot of the game mechanics for others actually come together and work as intended. This was really exciting as it reinvigorated us and reinforced that we have something good here!
The good news in the extra time between posts means there is a bit more to show!
Horse
The title of this post is two-fold. First, there were several concepts and functionalities that we experimented, or, “horsed around” with. Second, of course, the horse!
The prototype horse has been in the game for a couple of years now. It’s hidden away in a barn and we usually don’t tell players about it and let them discover it on their own. For those players that do discover the horse, they absolutely love it (even in its terrible, prototype state). We decided to have Tony create a walk and gallop animation for us to test ideas and concepts out with. Below are those animations:
Horse Walk RightHorse Walk DownHorse Gallop RightHorse Gallop Up
The animations feel very good in the game. However, one of the reasons we haven’t gone “full force” into the horse is of course the additions of all the new different kinds of animations we would need. We had an idea to potentially save time by cropping out the bottom half of our hero’s animations and replace them with a sitting / riding animation. However, this idea in practice is probably not going to end up working. We’re still “horsing around” with ways to make animations go quickly as we know everyone loves the horse. However, we still have a lot of other art / animations to get done before our Kickstarter goal and reworking current animations just to ride a horse may not be time best spent.
Riding Horse
Reptile Updates
We also have a few more animations to share about our good friend (rather, enemy), the Reptile, that we introduced in our previous post:
Reptile Heavy Swing DownReptile Stun LeftReptile Death Left
Sound Effects
It’s been long overdue, but at the beginning of July, Noah Flack began replacing many of the old, crusty placeholder sound effects with some new, polished sound effects. We started down the road of creating sound effects from scratch, but it seemed more feasible to use a library of sounds and update / alter them according to our needs. The library we are using in their licensing agreement has a restriction of “redistributing” these sound effects elsewhere. Though this post isn’t intended to be a place where we are redistributing sounds (as well as many of these are heavily modified and would be unrecognizable from the original source), we felt it would be safer not to showcase any of those sounds from that library. However, we do have a couple of sound effects that we created from scratch. Here are a few below:
Knight Ghost Hit
Knight Ghost Death
Raining Outside Perspective
Raining Inside Perspective
UI / UX Updates
There was a reason why we wanted to tell the stories at the beginning of the post that we did, and here is the first reason. While watching folks play the game, we noticed a few reoccurring behaviors that needed to be addressed:
1. Players had a hard time seeing how much damage they were taking in the “heart bar” in the top left of the screen. Though Violet’s iframes are intentionally small, we still found a way to communicate how much damage the player was taking by making an animation of the heart breaking. The more damage / combo damage that happens, the longer the delay for the start heart animation to playback.
Losing Health
2. In the same vain, players had a hard time seeing how much health they recovered when eating a recovery item. Now granted, we still don’t have an eating animation (which we plan to add). However, adding a heart animation that shows the player how much health they’ve recovered should help with this problem. The delay of the start of the animation works similarly to taking damage, in that the more health / combo health recovered will delay the start of the animation.
Gaining Health
3. We’ve also observed many folks in the colder regions wonder why they began taking damage. After the initial cold damage popup (which players may forget or ignore), there was no way of knowing why the player was taking damage other than seeing the temperature gauge down in the bottom right. However, before these updates, the needle was very small and hard to see. We’ve addressed this with a few things:
Made the needle bigger as well as change colors the closer it gets to the cold / warm zones
When taking cold damage, use a blue color instead of red
When taking heat damage, use a red color (like before)
When taking any other damage, use a violet color instead of red
When taking cold or heat damage, make the gauge turn colors and have a cold / heat animation playback
In cold / warm zones, shake the temperature gauge a little to grab the players attention
Freeze DamageBurn Damage
Doorframes
We ended up reworking doorframes a bit. We noticed when going through a doorframe with a weapon that the weapon was drawn in the wrong layer. This is because all we were doing to sell the illusion that our hero was going through a doorframe was turning the visible property on and off at the right times. This was a bit hacky and we went back and redid the way this works so that doorframes / doorways are on the appropriate layer now:
Doorway InDoorway Out
Other Notable Updates
Path Finding
At the crux of our Soldier AI is Game Maker’s path finding algorithm. In hindsight, Game Maker’s mp_grid_path function is impossibly fast (seriously, if anyone knows how this is implemented, hit us up) — which is unfortunate because our problem wasn’t with this function. Game Maker has two requirements for creating paths:
Grids, which is essentially “the world” made up of walls and not walls.
The aforementioned mp_grid_path function, which takes a grid and generates a path, most likely using an extremely optimized version of the A* algorithm.
The problem we were encountering was the time it takes to create grids. Though paths are extremely fast to compute, grids are on the slower side (perhaps Game Maker pre-optimizes the grids, which is why paths are so fast? We’re still not sure). We’ll explain why this is a problem soon, but we really need a solution from Game Maker described in this Reddit post.
The way Game Maker Studio encourages developers to use these functions is to create a “world grid” one time and be done. For the average developer using Game Maker’s mp_grid_* functions, this would be more than adequate. However, in our case, our world is huge and each enemy has a slightly unique grid. We’ve still been able to make great use of these functions though by doing a few workarounds.
To get around these problems, each Soldier enemy would create their grid based on the “chunk” of the world they resided in, as well as a few trade secrets. In the above link to the Reddit post, since there wasn’t a simple mp_grid_copy function, we were manually creating grids every time we needed them (smarter enemies would make a grid every 30 frames for example). This was costly on the CPU. We had several tricks to make this less intensive, such as offsetting each enemy to create their grid, essentially preventing multiple grids from being created on every frame. But this trick can only go so far.
One other problem we were wanting to solve for is the built in path finding deals with points, where our enemies and their hitboxes are bigger than one pixel (essentially wanting clearance-based path finding). It wasn’t a big deal until recently when we discovered our Centaur enemy, with its big hitboxes, kept running into the wall on a tight turn, and not able to clear it. With this problem and all the other aforementioned problems, we decided to roll out our own grid and pathing implementation.
We knew we needed to update the path finding algorithm itself, but the first thing we focused on was creating fast grids. Since we were able to roll out whatever solution we could build, we wanted to solve three things with our implementation of grids:
Have a “master” grid that all enemy / etc. grids would inherit from.
Only update enemy grids with necessary updates (i.e. only update when needed, don’t update everything every n frames).
It needs to be fast.
It took many nights and weekends to solve for this, but the solution we came up with for grids is ten times as fast as Game Maker’s grids!
We even solved a bonus problem introduced by our layerDepth system: instead of one grid per enemy, it was however many layerDepths there were per enemy. We ended up solving this problem with our friend, binary! Our grids represented a wall as 1 and a walkable tile as 0. We could express walls in layerDepth0 as simply 1 (0001). In layerDepth1, we would express walls as 2 (0010). But, what if we had a wall in both layerDepth0 and 1? We could express walls as 3 (0011). When we needed to know if a cell in a particular layerDepth had a wall, we could simply pull out the bits of a number and determine whether a wall was there or not.
Our last task was to actually implement our own variation of A* and clearance based path finding. Rolling this out in pure Game Maker has actually been more of a hindrance than a help. With the performance gains we’ve obtained from the grids, we’ve essentially lost that and then some with our implementation of A*. This isn’t because our implementation is bad — it’s actually really clever all things considering. It’s simply that GML is a language above C++, and the further we get from writing code in native 1‘s and 0‘s, the slower the code becomes.
We did implement one trick with our A* which essentially only computes an enemies path for 100ms for a given frame. If it takes longer, we store the computations its made and move on until the next frame, where we continue from where we left off. It’s essentially fake threading and is a good compromise for now. At the very least, we “break even” with our net performance gains / losses from all of this.
Where do we go from here? Well, one of the backburner tasks we’ve been wanting to implement is rolling out path finding on a different thread. Game Maker Studio has the ability to pull in from external resources, and this is the next logical step for us. Offloading the path finding in C++, as well as on a different thread is going to give us extreme performance boosts — especially with our Soldier AI being so integral to the game behind-the-scenes.
TileCompressedData
Another update we had to do was in regards to our build scripts. Game Maker 2022.8 introduced TileCompressedData to the IDE, which increases build times by tenfold. Before, Game Maker Studio did not compress tile data for rooms, which made the file size for larger rooms with many tiles in the megabytes. When doing builds, Game Maker would do comparison with these rather large room files, taking additional time for each build. So what’s the problem — this seems like a great thing?! Well, our build scripts were built with the uncompressed tile data, so we had to account for that. This was a weekend project, but we were able to reverse engineer how Game Maker Studio stores its TileCompressedData. That code is available here in our GMS-Tasks helper project.
Recorder / Playback Input
I bet you’re still wondering about the juicy details of what happened to my computer’s hard drive and what caused the micro stuttering? Well, if we recall back in December of 2020 we introduced a dev feature called “Playback Input” which lets us record all of the inputs we make and if something crashes, we can “playback” those inputs exactly to get the exact crash. Well the way we were handling this was less than optimal. The reason for this is not because we are incompetent, but at the time, Game Maker did not have a means of handling crashes. For example, if the game crashed, there was no way to “save” our input recorder since there was no way of handling unexpected crashes. Our hacky solution around this was to write out one file every frame of the game the input the player made. That way if the game crashed, we were able to “glue” those files together to create one big file.
The problem is writing 60 files every second while the game plays for the past two years has been taxing on my hard drive. Out-of-the blue one fine Saturday morning, our game finally had enough and began running terribly slow. I didn’t realize at the time that the problem was the Input Recorder. My brother-in-law was in town and as I was explaining the issue, he happened to noticed the SSD in task manager was maxing out at 100%. Once I remembered we were writing those files every frame, I turned the setting off and the game played normally again. After testing on my laptop, confirming no one else was having issues, and reinstalling Windows, that’s when I knew I was beginning to see a hardware failure.
Good news in all of this is I decided to buy the AMD Ryzen 5700x processor and the Corsair MP600 1TB M.2 drive. The processor cuts build times IN HALF and I’ve seen about 20% increase in build times with the faster read times on the M.2 drive. The other good news in all of this is unbeknownst to me, Game Maker Studio added the exception_unhandled_handler which lets us handle unexpected crashes gracefully. This lets us, for example, save out our input recorder, as one, sane normal file! All of that to say, we needed to update our Recorder Input to handle writing just one file and our Playback Input to read in this one file. Hopefully we won’t have to worry about future drive issues now 😛