
This title poorly summarizes what I have been working on over the last week. However, the last day or so I have been working on the Ice Rod and ice physics. So naturally this title came to mind. 😀
This is one of those instances where it has been great to look back at the past week. I was feeling a little discouraged, as if I had not done much. After looking at a diff between last weeks commit and my latest commit, I realized I had actually done quite a bit. It was a great starting point at looking at what I wanted to write up for this post.

Retro Palette Swapper Fix
As I mentioned in a previous post, we will be/are using a palette swapper for sprites. Here’s a quick example of what this means:


The Red Minotaur is currently the original sprite. With the palette swapper, we can simply tell a shader to change the red colors to blue. This makes it nice because we don’t have to recreate a ton of extra sprites for different colors. This saves on file size and time!
However, I ran into a bit of an issue.

For some reason, our friend (or enemy rather) was multi-colored. I spent a little bit debugging, but then ended up reaching out to the owner of the shader/plugin we are using. The support from the owner was amazing. After a few emails back and forth, it ended up being a graphic setting that needed to be toggled in Game Maker (Interpolate Colors Between Pixels). I’ll spare the details of what exactly this does (because it can get really technical), but it basically smooths out the graphics, which we don’t want for pixel art. With this turned on, the shader wasn’t sure if we were talking about red, or a “smoothed” red, and thus, it was not working properly. Turning off the setting fixed the issue and made our pixels look more “pixely” (which is good in our case).
Flying Objects and Shooting Off Cliffs Update
In a previous post, I mentioned that we now have the ability to shoot arrows off of cliffs. I ran into a bug with my quick solution to the problem originally. I ended up resolving with these four things:
- Every flying object has a
depthHeightwhich represents how “high” the object is. - Every wall that a flying object that can pass through has an
angleat which that object is allowed to pass through. Every wall also has the option to disable collision altogether, if an object’sdepthHeightis greater than 0. - If the flying object is passing through a wall between an angle of
-90and+90of saidangle, we increase ourdepthHeight, and store that wall so we don’t recalculate it. If the flying object is passing through a wall of the opposite angle as stated previously, we decrease ourdepthHeightand store that wall so we don’t recalculate it. - When a flying object collides with a wall, if our
depthHeightis0, the object stops moving.
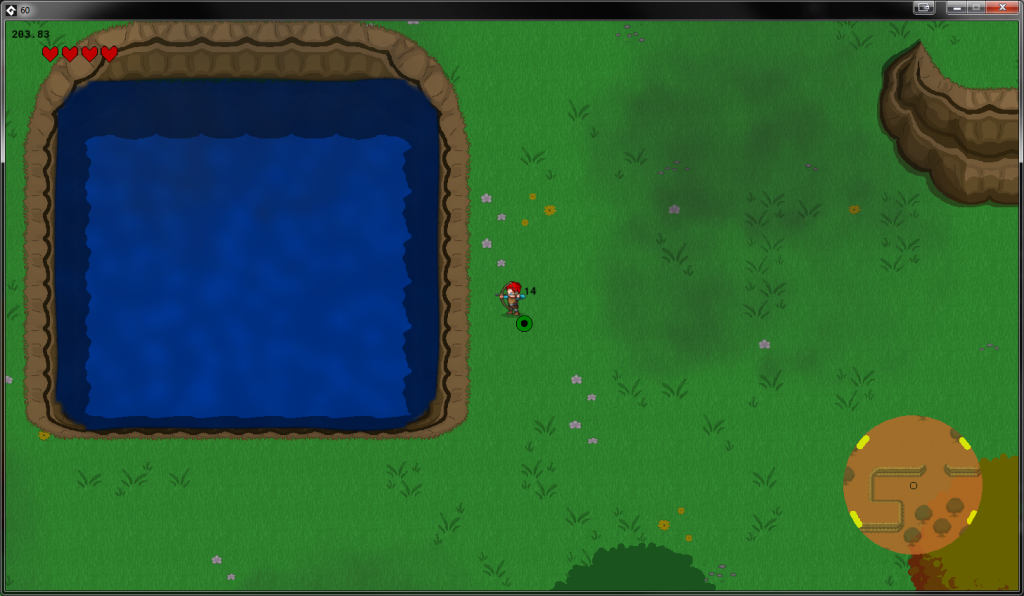
That was sort of technical, but this approach solved the bug. And now, we can shoot arrows, ice, fire, or any other projectile off of cliffs. It also let’s us shoot over a lake correctly, like below:
Updated Enemies and AI
We currently added a few more sprites with the Soldier type enemy as mentioned in a previous blog post. I called them Horned Knight (evil knight with a horned helmet), Reptile and Zombies. Zombies have to be the most fun:

When adding the reptile, I wanted the enemy to behave similarly to the Lizafos in The Legend of Zelda: Breath of the Wild, where the enemy can evade your attacks. So, now all soldier enemies have the ability to dodge (if we want to give them that privilege)! It currently works by the following rules:
- A property called
maxAttemptsis set on aSoldier. - Every time the
Soldier‘s target’s weapon is swung, increment aswingCountproperty. - When a timer goes off and the enemy is near the target, randomly, between
swingCountandmaxAttemptschoose to go backwards.
This approach works well when spamming the attack button, the enemy will have more of a chance to dodge your attack. I am not a big fan of the RNG at the moment. This is mainly because the Soldier enemy thus far is very logic driven. This is one of the few things left to chance. Perhaps I’ll come back to updating this when I can think of a better solution.
Climate
I haven’t talked much about the actual game world much. Most screenshots shown thus far are in a demo playground. The world is pretty large though.

If you look really closely in the center, there is a small white rectangle. This represents your viewport, or screen. There is not much in this world yet. Even if there was, the detail would be hard to see since we are zoomed out so far away.
What is pictured though is some obvious colored regions. These currently represent climate regions. In the east is the desert, where it is hot during the day and cold during the night. It will rarely precipitate. In the north is the mountain region, where it is brutally cold and storms (blizzards). The lower region of the mountains is cold, but not nearly as many storms. In the south is a beach, where it is hot! Finally, the west region has a swamp in the north west, where it is rainy and mild. The forest is due west, with a mid-west like fall climate. Finally, the southwest, is a jungle, where it is hot and rainy.
I mentioned the big regions, but the climate is actually controlled in two subsections smaller, actually called sections. Though these sections generally follow the above climate patterns, there are a few variations to these. For example, we are envisioning a town in the northern-east most area. This area currently will be cold, but without storms.
I ended up spending a day on this — coming up with the proper percentages (how often it can rain, being cloudy, etc.) and temperature ranges for each area and casually testing these out to make sure they were working properly. These are of course subject to change as the game progresses. 😉
Water (Again)
I decided to play around with water again. This is mainly because I knew I was going to be working on swimming this week. My findings were interesting, as I continued to play with blending modes and masks. I thought it would be important to create large bodies of water in the future. Thus, I decided that water should be created with shapes, and then a texture would be drawn within that area. There was a lot of learning here for me since I am not a GPU drawing wizard. I did manage to learn how to draw sprites/textures onto a masked shape.
With this learning though, the end result will be to scrap this approach. For one, each frame to draw the water, its shape, its ripple effect, its underwater objects, its reflections, etc. is pretty expensive. Even though I could spend hours optimizing and making better, was it really worth it? There have been two rules I have been following when creating something new:
- Is it believable?
- Is it fun?
Water is one of those things that is hard to make believable, because of its complexity. Though the effects were “fun”, Hannah and I didn’t find them to be believable. I had Hannah sketch up more of a Link to the Past style, which hopefully we can be implementing soon.

In the end, learning how to draw a sprite/texture onto a mask was a key learning and take away. I am currently masking sprites/textures roughly in a few places (for example, the mini-map in the lower right hand side of the screen). But with this new learning, this functionality can be cleaned up and reused throughout the game.
Swimming
If there is water, then there must be swimming. Swimming is an interesting mechanic because to make it believable, most games will reduce the speed of movement, as well as eliminate attacks altogether. Personally, I dislike parts of games that make me swim, because I don’t like having my movement constrained.
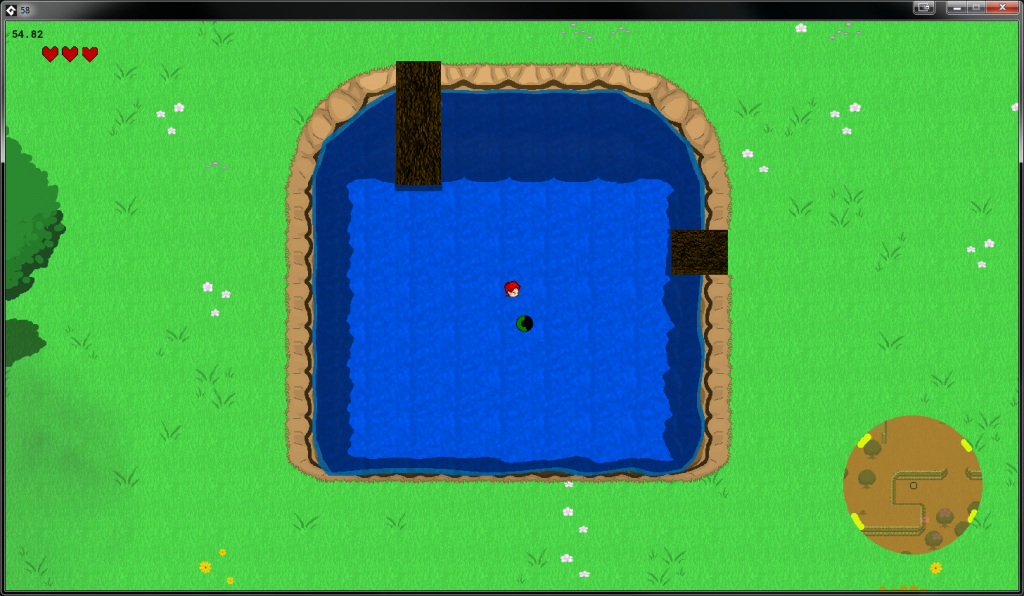
The current implementation we went for is to be believable, and all movement is a third of what the hero can do on land. However, we do allow the player to attack — but again, at a third of the movement. This allows for some interesting combat in the water. My end goal though is to think of a clever way to make a believable water scenario where movement feels slick. Worst case scenario, we will design the game around spending less time in water, for those like me who dislike the slow movement.
If we can jump into water from a cliff, we need the ability to get out of water with some kind of “dock” mechanic. In the screenshot above, we have added docks to the lake. When colliding with the dock on the edge, it makes the player “jump” out of the water. It’s currently the same mechanic and animation used to jump off of cliffs. In a future polish update, we can change that around to look more like the character is getting out of the water.
Finally, ICE
Ice currently has some interesting behavior. My goal with fire, ice, and water is to develop a Rock-paper-scissors concept, where fire beats ice, ice beats water, and water beats fire. Currently fire is used with the Fire Rod, torches, and enemy’s that breathe fire. Water is currently developed where there are natural bodies of water and rain.
Where ice is “nice” is when it interacts with water, because ice beats water. Whenever the Ice Rod is shot near water, it creates Ice Blocks which the player can walk on.
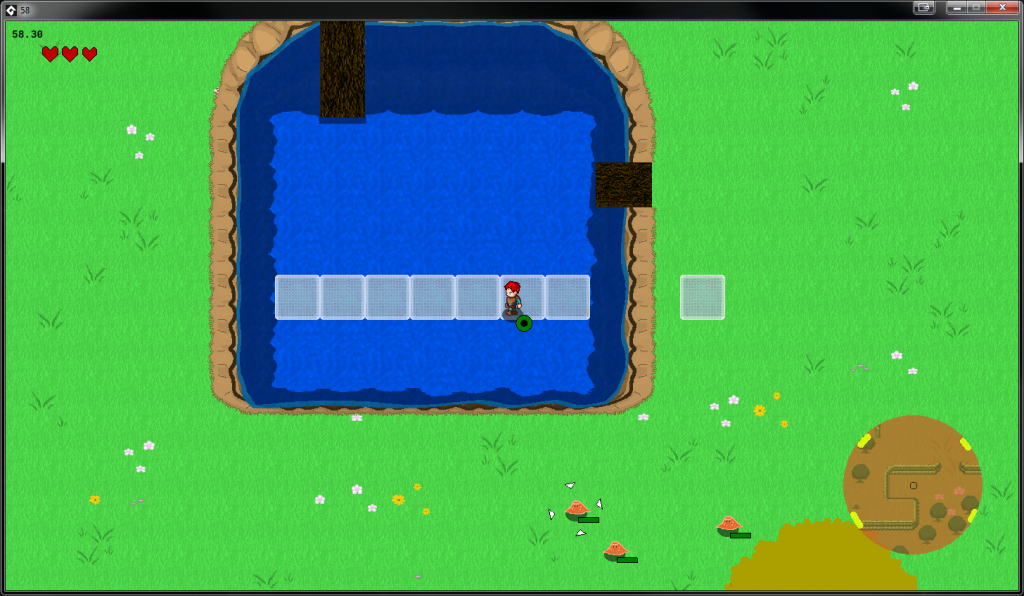
Since it is ice we are walking on, there of course is ice physics that makes the player feel like they are on ice. Originally we had this less slippery, but most of the feedback I received so far was to make it more slippery. We’ll continue to tweak the values so that it feels believable, but not annoying. We aren’t creating an ice simulator, after all.
Since fire (heat) beats ice, ice currently melts during game play. I have an interesting formula I would like to share. I call it Ice Melting Rate:
var rate = ((logn(62, temp + 30) - 1) / 200)
The inputs are a temperature. Temperatures are based in Fahrenheit. Currently the lowest temp in the game world is -22°F. We add 30 to the temperature always because the logarithmic function cannot accept zero or negative values. We then use a base 62 logarithmic function. Let’s say our temperature is 32, which is freezing. When we add 30 to that number, we get 62. I wanted freezing point to always return 1. Thus, log base 62 of 62 would yield 1. Numbers that are less than one will actually freeze the ice tile faster, while numbers above 1 will melt the ice, but not at the same rate as freezing. We subtract 1 from the output of the logarithmic function because in the game, rate being a negative number will increase the melting timer (we subtract from rate and if rate is a negative number, we’re really adding). Finally, the constant 200 seemed to be a good number that gave us good rate at which every frame of the game the ice melts.
In practical terms, when ice is around 40°F, it will take 56 seconds for the ice to melt, where as ice around 70°F will take 14 seconds to melt. In game terms, if the player is standing on ice above water, and the temperature is warm, the player better hurry to create more ice, or they will fall through into the water!
Conclusion
After writing this, I realize that there was definitely a lot accomplished! I think moving forward, it will probably be best to write blog posts every couple days with the feature that was being worked on, instead of a week’s worth of features.
All that to say, a lot of progress has been made this past week, and I cannot wait to share the next set of features!